Hacking Into a 20 Year Old TiVo — Part 3; Video and the TiVo Media File System

Table of Contents
If you haven’t yet, I encourage you to read through Part 1 and Part 2 of this series, where we worked to create a disk image of our TiVo drives, and get VirtualBox installed and configured. For the remainder of this project we’ll be working totally within our VirtualBox VM, using our shared folder to transfer files from our TiVo’s drive to your Linux workstation (for further processing and long term storage).
Now on to the fun stuff!
For the remainder of this tutorial, we’ll be operating as the root user. Operating as the root user goes against most of the current best practices for working on Linux systems, but it’s simply easier for what we’re doing here. Is it possible to do everything outlined here as a non-privileged user? Yes, absolutely. Is it worth the effort? No, not really. So root we are.
Once logged into your VirtualBox VM, and you’re in the Terminal app:
$ sudo su -
[sudo] password for ben:
root@debian:~# █
Initial mfs-utils configuration
mfs-utils expects to have an environment variable set, which it uses to access the TiVo disk drives.
The data for this environment variable can be found through the output of an fdisk -l command. As with earlier, you’re looking for a disk (or disks) probably labelled /dev/sdb or /dev/sdc, which appear to have no valid partitions, and are the exact size of your TiVo’s hard disk drive:
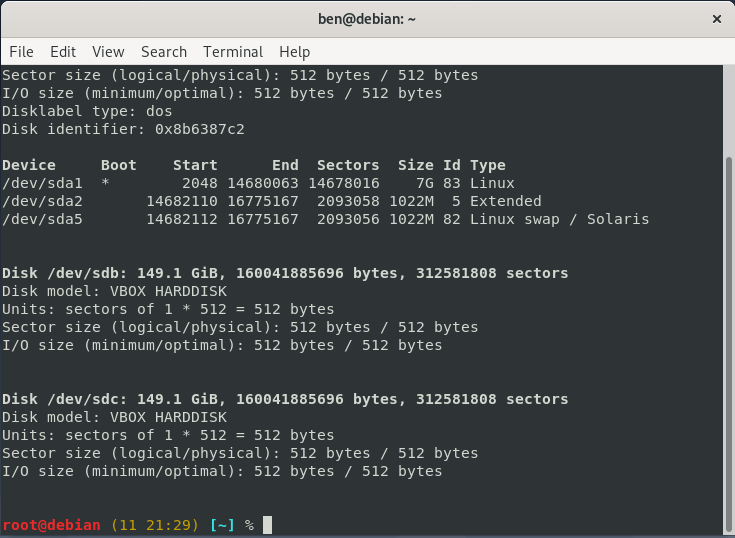
Using these device names, we can create our environment variable MFS_DEVLIST:
root@debian:~# export MFS_DEVLIST="/dev/sdb /dev/sdc"
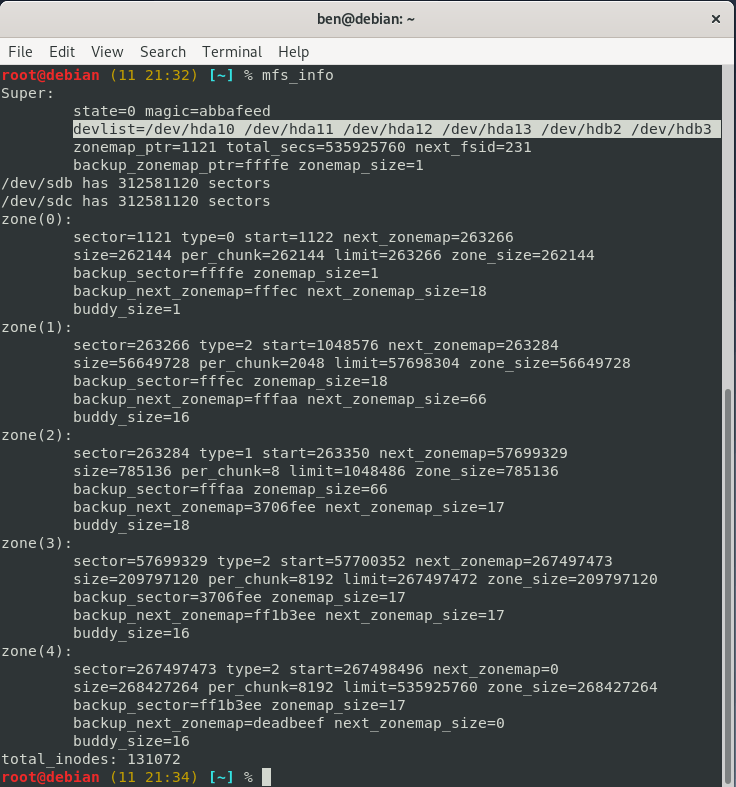
At this point, you should be able to run a mfs_info command, which will return data on the structure of the MFS filesystem on your TiVo virtual drives:
I would suggest appending this environment variable to your ~/.bashrc so it’s automatically set every time you log into this VM:
root@debian:~# echo 'export MFS_DEVLIST="/dev/sdb /dev/sdc"' >> ~/.bashrc
mfs-utils was developed and released almost 20 years ago, and at the time all IDE-interfaced devices were made available in Linux via /dev/hdX (SCSI was /dev/sdX). In 2006 a
fundamental change was made
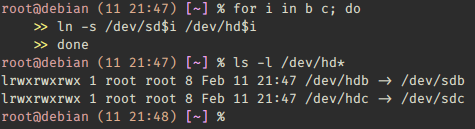
to the kernel libraries for IDE/PATA and SATA drives, unifying them under libata, which for us has the consequence of our TiVo drives showing up as /dev/sdX. mfs-utils has been hardcoded to expect /dev/hdX devices (sdx vs. hdx), so we need to make a quick fix. Fortunately, this is as simple as a symlink:
root@debian:~# for i in b c; do
                   ln -s /dev/sd$i /dev/hd$i
               done
We’re creating a symlink which points /dev/hdX (which mfs-utils needs), to /dev/sdX (which is accessible in our VM).
Let’s find some video
mfs-utils is now completely configured, so let’s poke around and see what we can find. There are a few key concepts that I’ll cover here to get us started:
- Streams — TiVo refers to a video file as a stream. As far as I can tell, a stream is a single asset, so there is one stream for each video file (television recording) stored on your TiVo.
- FSID — TiVo’s MFS filesystem is organized more like a database and rather than traditional POSIX file paths, refers to data through FSIDs (File System ID). You will use FSIDs extensively to access content on the TiVo filesystem.
- MFS — Media File System is a proprietary file system used on TiVo hard drives for fault tolerant real-time recording of live TV.
To obtain a listing of all streams present on your TiVo:
root@debian:~# mfs_streams
This command will output all of the user-recorded video available on your TiVo drive(s). Depending on how many recordings you have saved, this command may return a lot of data. In my case 301 different videos!
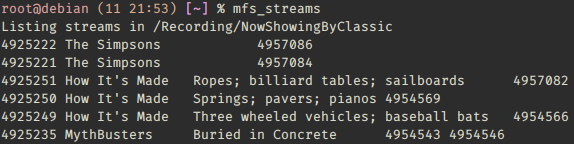
The output from mfs_streams is organized as:
fsid | Show Title | Video block fsids
To export a video:
root@debian:~# mfs_uberexport -v -o $shared_folder_mount_location/$video_title.ty -R $stream_fsid
In my case, the VirtualBox shared folder was setup to mount in /home/ben/tivo and I would like to extract the first Simpsons video in the list, so I would enter:
root@debian:~# mfs_uberexport-v -o /home/ben/tivo/source_video/simpsons.ty -R 4925222
You’ll repeat this export process for each video file you’re interested in saving. While you can do this by hand, it’s pretty easy to script. Here’s a quick script which extracts videos with a given name (grep -i) and saves them to your shared folder location:
mfs_streams |sed 1d |grep -i “Simpsons” | while read -r line; do
  FSID=$(echo $line | awk ‘{print $1}’)

  TITLE=$(echo $line | tr -d [:digit:][:punct:] |tr -s ‘[:blank:]’ ‘_’ |sed -E ‘s/(^_|$)//;s/_$//’)

  ORIG_AIR_DATE=$(mfs_dumpobj -h -l -r ${FSID} |grep OriginalAirDate[49]* |awk -F\( ‘{print $2}’ |sed -E ‘s/(Mon |Tue |Wed |Thu |Fri |Sat |Sun )//’ | tr -d [:punct:] |tr -s ‘[:blank:]’ ‘-’)  OUTPUT_DIR="/home/ben/tivo"  OUTPUT_FILE="${TITLE}-${ORIG_AIR_DATE}.ty"  echo -e "\nExporting ${OUTPUT_FILE}... "  mfs_uberexport -v -o "${OUTPUT_DIR}/${OUTPUT_FILE}" -R ${FSID}done
TiVo Video Container
You’ll notice that I used the .ty file extension for my video export. Series 1 TiVos utilized a
custom video container
, which contain MPEG-2 encoded video streams, mp2 audio files and optional caption files. I have no confirmed information, but I suspect the ty container format was designed to be similar to the
MPEG Transport Stream
container format, used in broadcast television. If you’ve watched standard definition programming through your cable provider, it’s likely been encoded as MPEG-2 video and audio.
Chances are you can likely play these .ty video files in a newer feature rich video player like VLC , or MPlayer , but for portability we’ll transcode into a more modern and standards-based video format.
Transcoding TiVo Video
Encoding or Transcoding?
While similar, there are slight differences between encoding and transcoding.
- Encoding takes either analog or uncompressed source content, and converts it to a digital format.
- Transcoding converts one digital file format to another.
Because the video files coming out of our TiVo are already in a compressed digital format, and we want to convert them to another digital file format we’ll be transcoding them.
Transcoding with FFmpeg
Newer versions of FFmpeg and Handbrake have native support for ty video files, and we’ll use that support to transcode our video streams. Don’t forget, the video streams on your TiVo have already been encoded using the MPEG-2 codec, and at various levels of quality (bitrate). When you originally set up your TiVo, you had the option to select a recording quality setting. The quality setting you selected (Best Quality, High Quality, Medium Quality, Basic Quality) effectively defines the bitrate used when encoding the ty video files to your TiVo’s hard disk. I haven’t been able to find definitive documentation on the actual bitrates for each quality setting, but you can safely assume that the lower quality settings will probably have lots of blocking and artifacting. All this to say, you’re not going to improve the quality of your recording through transcoding. These TiVo streams are interlaced broadcast resolution (352 x 480), so don’t expect quality results if you upscale them to anything higher than their native resolution. Our goal here should be to preserve the existing video quality, transcode into a modern, standards-based container format (mp4, webm, vp9, mkv, etc) and ideally reduce the video file size. Let’s get to it!
A very quick and dirty transcode to H.264 using ffmpeg would look like:
ffmpeg -i $input_file -c:v libx264 -preset slow $output_file
If you wanted to transcode to a visually lossless output file using the H.264 encoder, we can use the -crf (
Constant Rate Factor
) option of ffmpeg, with a value of 18 which will likely produce a larger output file but should be visually identical to your source file:
ffmpeg -i $input_file -c:v libx264 -preset slow -crf 18 $output_file
Finally, let’s remove the interlacing which is present in our source video. We’ll use the -vf (Video Filter) option of ffmpeg with a value of yadif (
yet another deinterlacing filter
) to deinterlace our transcoded video:
ffmpeg -i $input_file -c:v libx264 -vf yadif -preset slow -crf 18 $output_file
ffmpeg is an amazingly powerful tool, and brings with it a huge number of options and configurations. This power and flexibility entails a steep learning curve, of which we’ve just scratched the surface. IMHO it’s a great utility to spend some time with and learn more deeply, you’ll find uses for it all over the place.
Transcoding with Handbrake
A great GUI-based and ffmpeg-powered encoding tool is Handbrake . Handbrake will provide most of the flexibility and power of ffmpeg, but through an easy to use GUI application. This is a great tool to quickly produce quality results. Because Handbrake is powered by ffmpeg it also natively supports TiVo ty files, so this allows you to open a .ty file directly in Handbrake and transcode to any of the output formats it supports.
Transcoding for video editing
The examples provided so far, are rather simplistic, taking the input ty video and transcoding to something else. What if you wanted to edit a video before transcoding to a final version, perhaps removing the commercials? There are a great number of video editing applications, which are outside the scope of this project but all have one thing in common — no support for TiVo ty files. Fortunately, this is easy to solve for.
Remember the ty container format is loosely based on MPEG-TS and contains video encoded with the MPEG-2 codec, so we’re simply going to convert our .ty video files to .mp2 MPEG-2 video files, which can be used in a video editing application.
We have two basic ways of doing this, the first being a conversion after we’ve exported the TiVo ty file:
# Exporting the TiVo video stream
mfs_uberexport-v -o $output_file -R $fsid

# Converting the .ty format to MPEG-2
ffmpeg -i $input_file -codec:v mpeg2video -codec:a copy -o $output_file.mp2
The second way to transcode into MPEG-2 is to perform the conversion as you’re exporting the stream. The benefit here, you don’t need the additional disk space for the intermediate .ty video file:
mfs_uberexport -v -R 4925222 | ffmpeg -i - -codec:v mpeg2video -codec:a copy output.mp2
If you’re really into preservation of video quality, and expect to do some serious work in a video editor, you can transcode into an uncompressed video format. Beware though, uncompressed video is massively large:
| 30 Minute Video | Resulting Size |
|---|---|
| TiVo .ty | 439 MB |
| .mp4 | 238 MB |
| Uncompressed .avi | 13,000 MB (13 GB) |
To create an uncompressed video:
ffmpeg -i $input_file -vcodec rawvideo -pix_fmt yuv420p $output_file
A fun fact is that you can actually compress this raw video file using standard Linux utilities if you wanted to keep that raw video around for future use and you don’t want to devote the large amounts of disk space.
I used lzip to compress a 30 minute raw video file, resulting in a file size of 2.8 GB. That’s a savings of ~78%! The downside, it took 78 minutes to compress this single file.
$ time lzip raw-video.avi  real    77m31.019s
  user    76m48.403s
  sys     0m7.568s

$ lzip --list raw-video.lz
   uncompressed      compressed   saved  name
    13730341352      2993476969  78.20%  raw-video.lz
In Closing
This was a fascinating journey, which took close to two months to complete. I had many false starts, and ran into a bunch of dead ends, but had a blast and learned a ton along the way. I spent a lot of time digging through old TiVo related forums, tracking down long-abandoned software, reading through it’s source code to understand how it’s working to get to this point. I’m hopeful this guide will prove useful to future TiVo explorers, and also serve as documentation for me if (when?) I do this again.
In Part 4 , I’ll document all of the other information and software I found along the way, which may be useful for other TiVo and Linux hackery.