Hacking Into a 20 Year Old TiVo — Part 4; Tools, Tips and Tricks
Table of Contents
If you haven’t yet, I encourage you to read through Part 1 , Part 2 , and Part 3 of this series, where we worked to create a disk image of our TiVo drives, and get VirtualBox installed and configured, extracted and transcoded video from our TiVo.
This final chapter of the TiVo hacking series is a listing of the various tool, tips and tricks I picked up along the way. There’s really no other purpose other than to provide the resources I found useful along the journey1.
Vintage TiVo (Series 1 or 2) Online Resources
- Hacking the TiVo Chapter 5 — Backing up and Restoring TiVo Data
- TiVo Hacks — 100 Industrial-Strength Tips & Tools. (Also available via Flylib.com )
- Direct extraction from a tivo drive in a pc (not networked)
- Bill von Hagen’s “Hacking the TiVo” Page
Vintage TiVo (Series 1 or 2) Software
- MFSTools
- My Github backup
- MFSUtils
- My Github
backup
with added support for
mfs_dumpobjJSON output
- My Github
backup
with added support for
- Bill’s Accumulated TiVo Boot Disk CD ISO Image
- Contents of this ISO are available in my Github Repo
Creating VirtualBox VMDKs
- Convert a Linux
ddimage file to a VMDK for use in VirtualBox:
VBoxManage convertfromraw $source_file.img $destination_file.vmdk --format VMDK
- Create a new VMDK file, which uses the Linux
ddimage as it’s backing store:
VBoxManage internalcommands createrawvmdk -filename $vmdk_filename -rawdisk $source_file.img
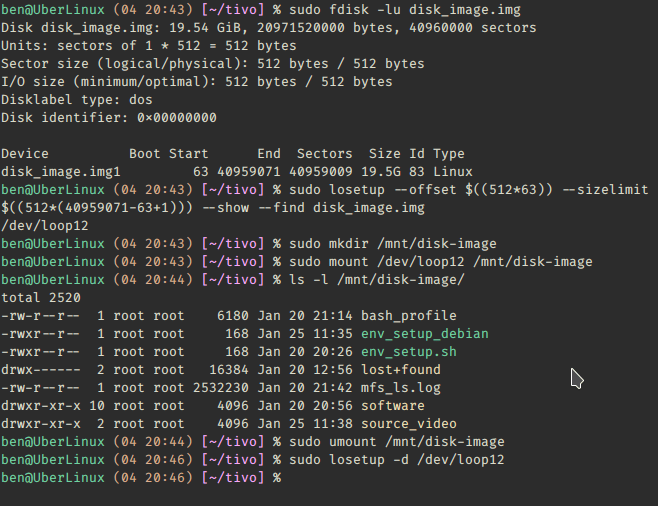
Mounting a Partitioned Linux Disk Image
Assume you created a Linux disk image using dd or ddrescue, which contains a partition and a known filesystem (e.g. ext[2,3,4]). The following steps will allow you to mount a partition from within this disk image to access the data:
sudo fdisk -lu $disk_image.img- Take note of the Start and Sectors columns
sudo losetup --offset $((512*63)) --sizelimit $((512*(40959071-63+1))) --show --find disk_image.imgThe
losetup --offsetcommand is in the format of:losetup --offset $((sector size * Start)) --sizelimit $((sector size * (End - Start + 1)))This will return a loop device number
sudo mkdir /mnt/disk-imagesudo mount /dev/loopX /mnt/disk-imageWhen finished with the device:
losetup -d /dev/loopX
Customizing the TiVO BATBD ISO Image
The BATBD CD was included with both the 1st and 2nd editions of Bill von Hagen’s “Hacking the TiVo” books. Bill generously made the first version of this CD available via his website , and the steps listed here allow you to customize this CD to include additional software or configurations you may find useful.

Keep in mind, this CD was created around 2003, so the kernel and software running in this CD are dated.
export TIVO_HOME="$HOME/tivo"mkdir -p $TIVO_HOME/batbd-newsudo mkdir /mnt/isosudo mount -o loop BATBD.iso /mnt/isocp -a /mnt/iso/* $TIVO_HOME/batbd-newor clone the Github repo listed above, the contents are identical to what’s contained within this ISO image.vi $TIVO_HOME/batbd-new/isolinux/isolinuxCustomize as you wish. For example I created a variant of the s1swap boot option, only byte-swapping the two devices I know to be TiVo MFS disks:
label mytivo    kernel s1swap    append hdc=bswap hdd=bswap initrd=initrd1.img
load_ramdisk=1 prompt_ramdisk=0 rw root=/dev/ram
Adding Additional Software to the TiVo BATBD ISO Image
All the default software available on the CD is stored within the initrd1.img kernel image. You can add additional software to this (soon to be) ISO image, but we’ll have to take some extra steps to access it later. The BATBD image is running kernel version 2.4, and is 32-bit. Additionally, there are no gcc-like tools on this live CD, so you’ll have to build and compile any additional utilities you need before copying into this live CD.
Copy any additional software you want to have access to into $TIVO_HOME/batbd-new/
Creating a new TiVi BATBD ISO Image
To create a new ISO image, we’ll be using the mkisofs Linux utility:
cd $TIVO_HOME/batbd-new/
mkisofs -o new_iso.iso -b isolinux/isolinux.bin -c isolinux/boot.cat -no-emul-boot -boot-load-size 5 -boot-info-table -iso-level 2 ./
- You can now use
new_iso.isoin your VirtualBox VM, as you would have the original BATBD CD Image. - To access the additional software you burned into this image, you must mount the CD once booted into the OS:
mount -o loop /dev/cdrom0 /mnt- All newly installed software can now be accessed from /mnt/
In the 4+ years since this post was first published, many of the original links referenced throughout this TiVo hacking series are no longer functional. Fortunately the Internet Archive’s Wayback Machine had a copy of everything, with the exception of the BATBD ISO, which I was able to upload. These links now point directly to the latest valid capture from the Internet Archive. ↩︎