How to Use Your DSLR Camera as a Webcam in Linux
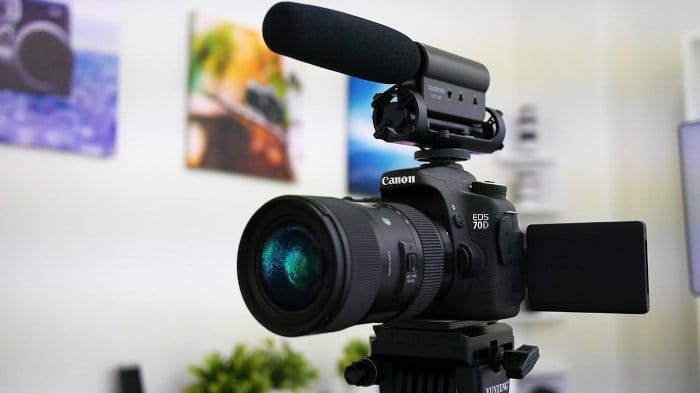
Table of Contents
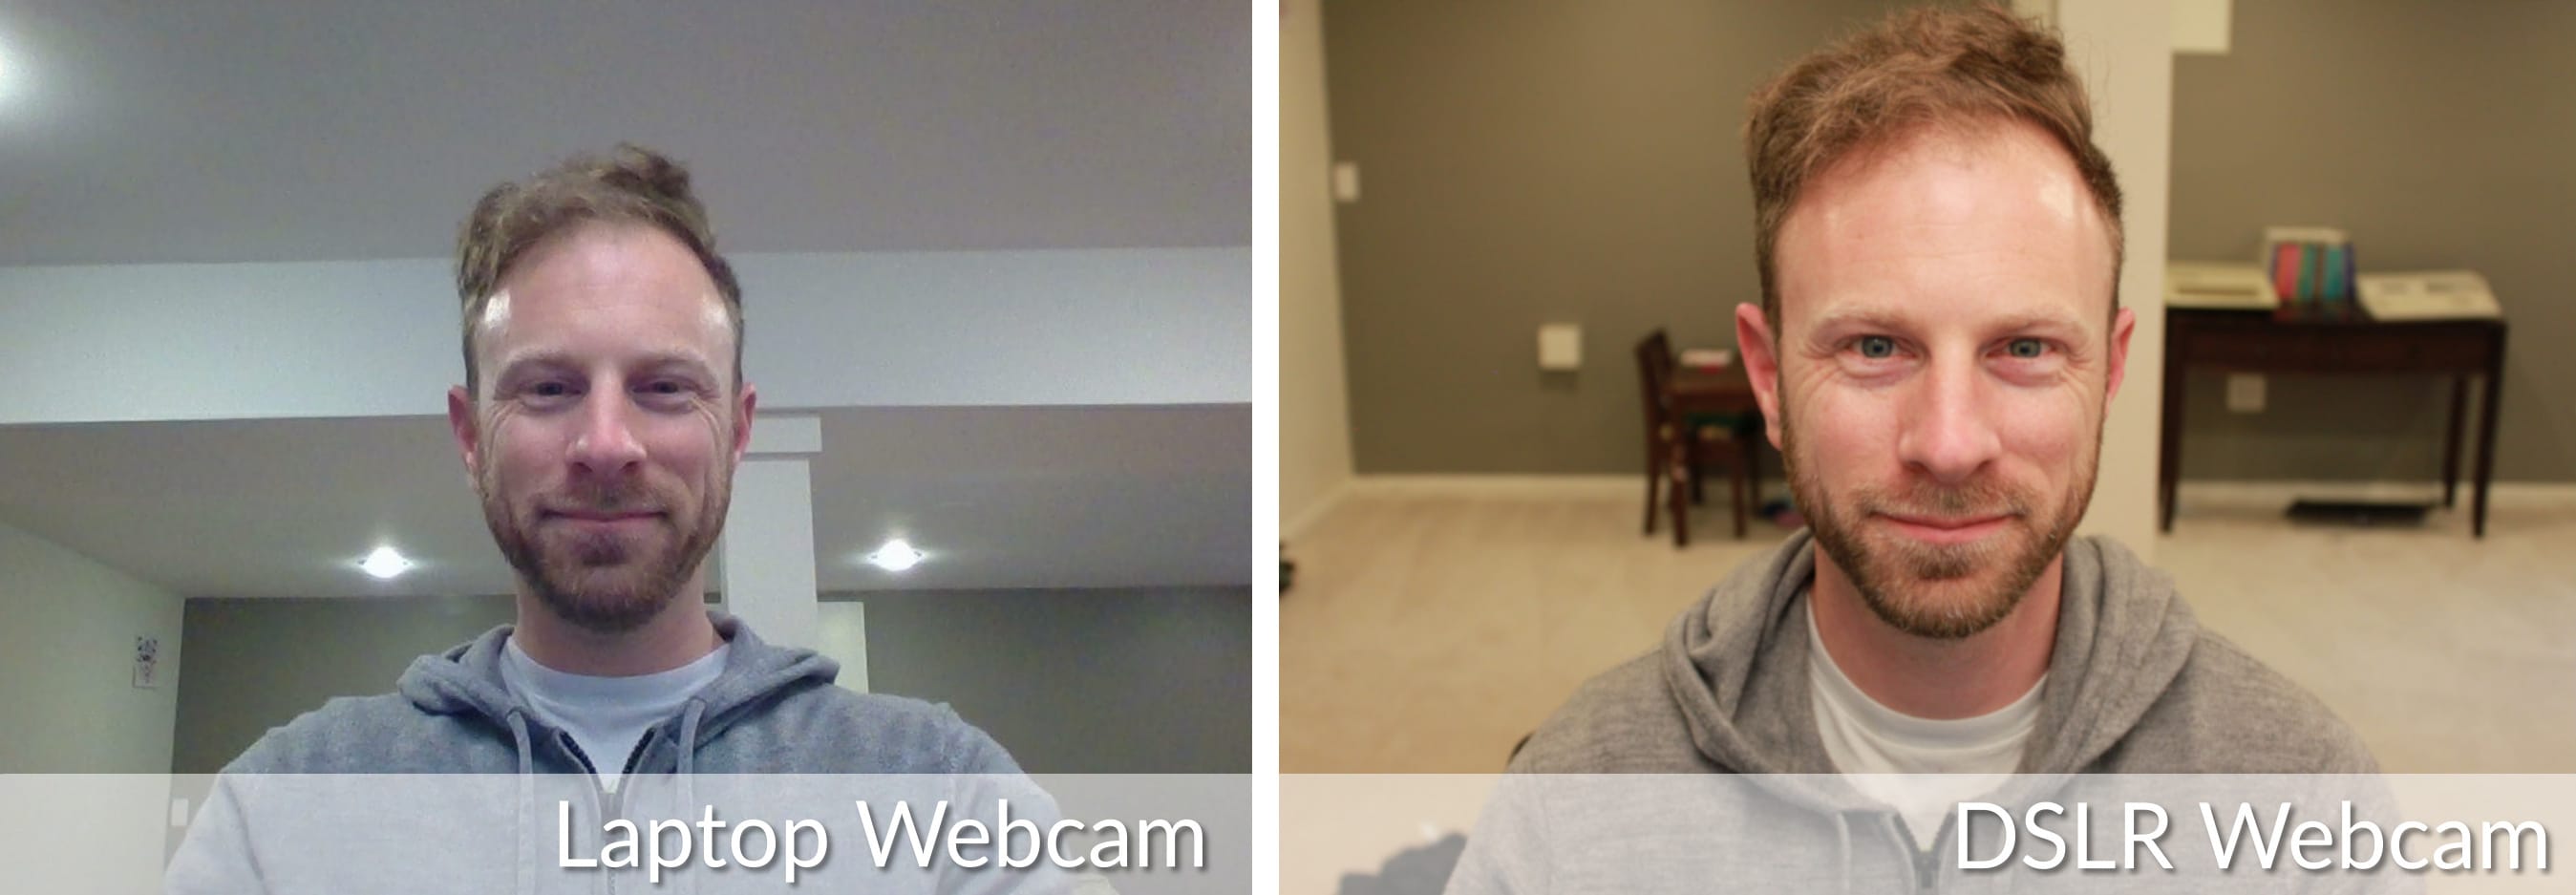
If you desire a more professional looking image when video conferencing, it turns out that you can use a DSLR camera as your webcam. Using a DSLR provides a number of benefits over an off-the-shelf webcam, most notably higher image quality, ability to finely adjust the frame of an image (zoom, wide angle), and adjust the depth of field. The depth of field adjustment is what allows for a nice, smooth, blurred background.
It’s straightforward to get setup within Linux, this is the guide for how it’s done.
Hardware Needed
- A camera supported by gPhoto , with Liveview capabilities
- Ability to connect your camera to your Linux-based PC through a USB cable
- Ideally some way to power your camera through a power supply. You can run from your camera’s battery, but run time will be limited
Software Needed
- gPhoto
- v4l2loopback
- ffmpeg
- VLC (Optional, used for testing)
Before Getting Started
The configuration as detailed here works very well for most people. There are however a few important limitations to be aware of before you get started
You will not capture the full resolution of your camera’s image sensor.
This guide uses the gPhoto2 application and associated libraries, which enables you to control your camera through terminal commands. gPhoto2’s movie capture mode captures a series of preview frames from your camera and outputs them as a motion JPEG video format. The resolution of the preview frames captured from your camera varies, but will likely be less than 720p (1280x720).
It would be great to capture an HD quality image from a large, sophisticated and expensive camera, but in my experience the resolution doesn’t matter as much as you might think. The greatly enhanced optics, large image sensor, and depth of field provided by a DSLR camera contribute to a much better looking image.
Video capture and encoding is CPU intensive and your system may have performance issues.
I developed this guide on an AMD Ryzen 7 workstation which had the processing power to ingest and transcode the video stream from my camera with no issues. Make no mistake though, video transcoding (as we’re doing here) is CPU intensive, and some lower-powered computers will have performance issues. It’s hard to say what the minimum specs are for this guide, but an Intel i7 class processor is close to the minimum needed to use this effectively.
Software Setup
Installing the required software can be accomplished through your distro’s package manager:
Debian/Ubuntu
sudo apt-get install gphoto2 v4l2loopback-utils v4l2loopback-dkms ffmpeg
Arch Linux
pacman -S gphoto2 v4l-utils v4l2loopback-dkms ffmpeg
Fedora
sudo dnf install gphoto2 v4l2loopback ffmpeg
Video4Linux Configuration
Once you’ve installed the required packages, connect your camera to your PC via USB and power on the camera. You can safely ignore any OS popup message which may appear.
Open your Terminal application, and enter the following command:
sudo modprobe v4l2loopback exclusive_caps=1 max_buffers=2
Loading this kernel module manually (through modprobe) means you will have to remember to modprobe every time you reboot. To ensure this module is enabled when your system is booted, you need to edit one config file /etc/modules, and create a new module config file /etc/modprobe.d/dslr-webcam.conf:
/etc/modules:- Add
dslr-webcamas a new line at the end of/etc/modules. If you have nothing but comments in this file, just adddslr-webcamas the last line in this file.
$ sudo vi /etc/modules # /etc/modules: kernel modules to load at boot time. # # This file contains the names of kernel modules that should be loaded # at boot time, one per line. Lines beginning with "#" are ignored. dslr-webcam- Add
- Using
sudocreate a new file/etc/modprobe.d/dslr-webcam.conf- Add the following content to this file, and save
# Module options for Video4Linux, needed for our DSLR Webcam
alias dslr-webcam v4l2loopback
options v4l2loopback exclusive_caps=1 max_buffers=2

We’re using the alias functionality of modprobe.d to provide an alternate and more descriptive name (dslr-webcam) for our Video4Linux kernel module.
gPhoto2 DSLR Testing
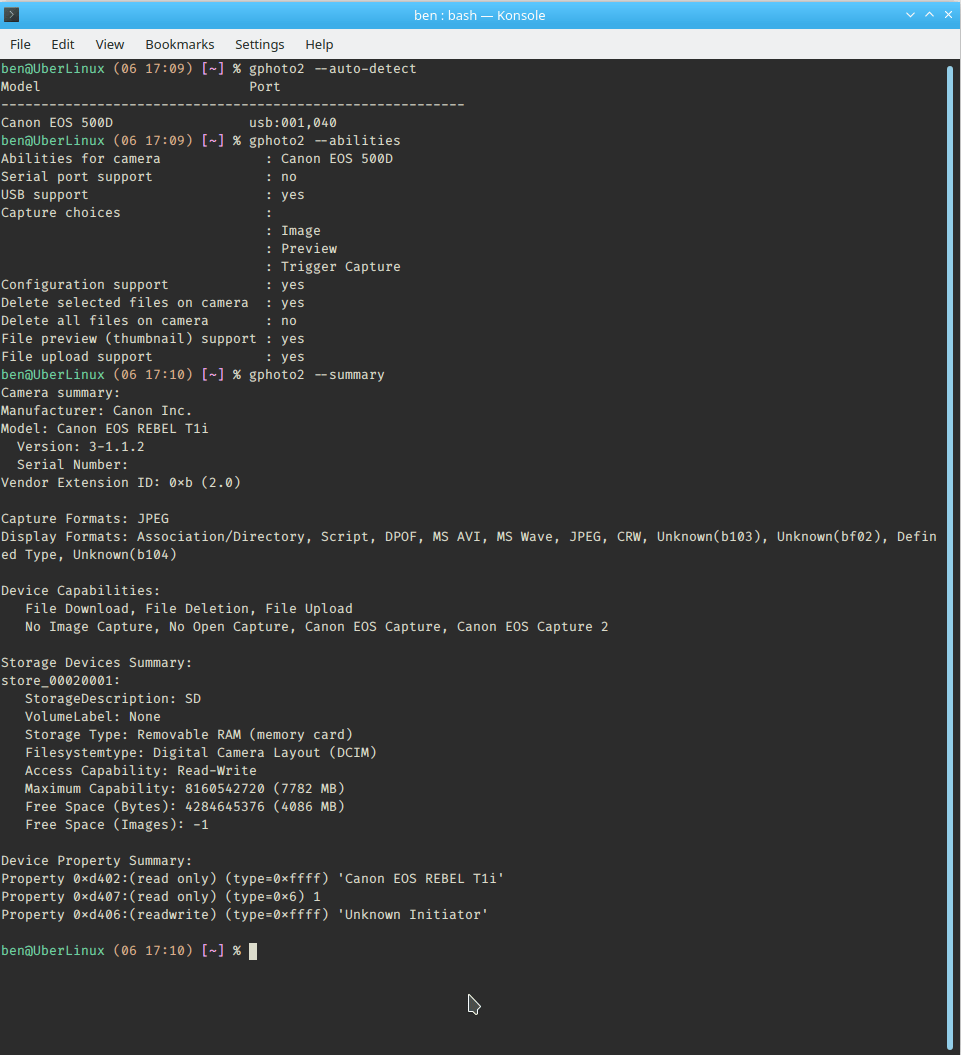
At this point, you should have everything configured to start testing. Still within your terminal, validate that gPhoto can see and interact with your camera:
gphoto2 --auto-detect- List auto-detected cameras and the ports to which they are connected.
gphoto2 --summary- Summary of camera status.
gphoto2 --abilities- Display the camera and driver abilities specified in the libgphoto2 database. Use
--summaryto query an overview of the camera.
- Display the camera and driver abilities specified in the libgphoto2 database. Use
You should now see the correct camera and gPhoto is able to report on it’s capabilities:
DSLR Webcam Video Testing
Still within the terminal let’s start with something simple, capturing a single photograph. This command will take a single photograph using the settings defined on your camera, and save it to your PC:
gphoto2 --capture-image-and-download
Assuming that was successful, let’s try to stream video from the camera. First identify the device number assigned to your webcam with the following command:
v4l2-ctl --list-devices |grep -A1 Dummy
On my workstation, this command returns /dev/video0, yours may be different. Substitute your /dev/video device path as needed throughout the rest of this guide.
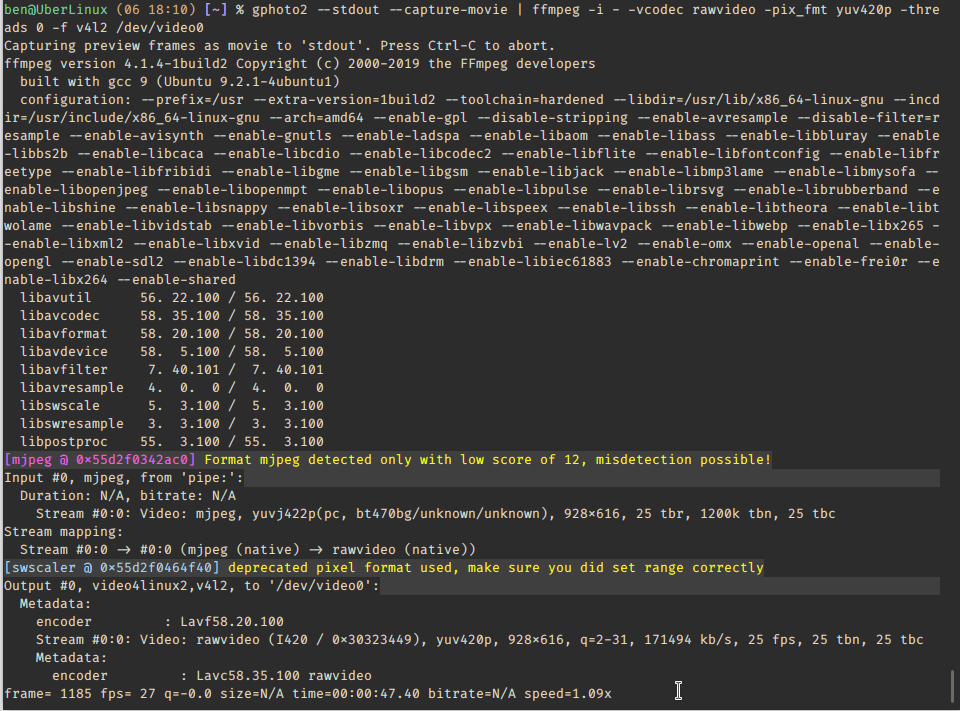
gphoto2 --stdout --capture-movie | ffmpeg -i - -vcodec rawvideo -pix_fmt yuv420p -threads 0 -f v4l2 /dev/video0
With this command, we’re:
- Capturing data from the camera’s image sensor with
gphoto2 - Piping that data into
ffmpeg, which is taking the mjpeg stream fromghoto2and exposing it to the Video4Linux loopback device
If you have a build of ffmpeg which supports GPU-based encoding, you can offload the decoding of the gphoto output to your GPU to reduce the CPU load associated with this process.
You can verify if you have capability for GPU offload by running ffmpeg -hide_banner -decoders |grep mjpeg_cuvid. If this command returns V..... mjpeg_cuvid Nvidia CUVID MJPEG decoder (codec mjpeg) (or something similar), you’re all set.
For GPU-based decoding you’ll want to pass -hwaccel nvdec -c:v mjpeg_cuvid info your ffmpeg command:
gphoto2 --stdout --capture-movie | ffmpeg \
-hwaccel nvdec \
-c:v mjpeg_cuvid \
-i - \
-vcodec rawvideo \
-pix_fmt yuv420p \
-threads 0 \
-f v4l2 /dev/video0
You should see the verbose output from ffmpeg, with the last line providing detail on encoding status:
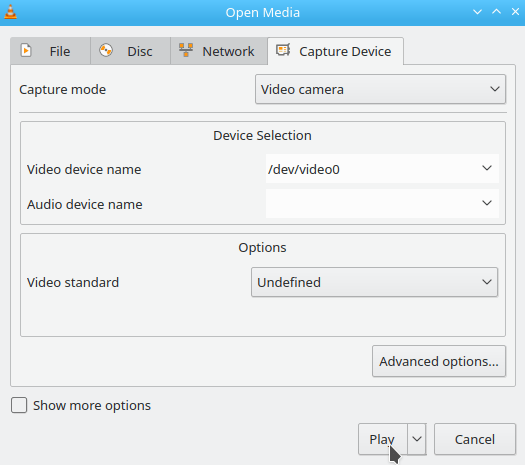
Now, open the VLC application, select the Media Menu -> Capture Device (Ctrl+c). Enter /dev/video0 as the “Video Device Name”, and click the “Play” button.
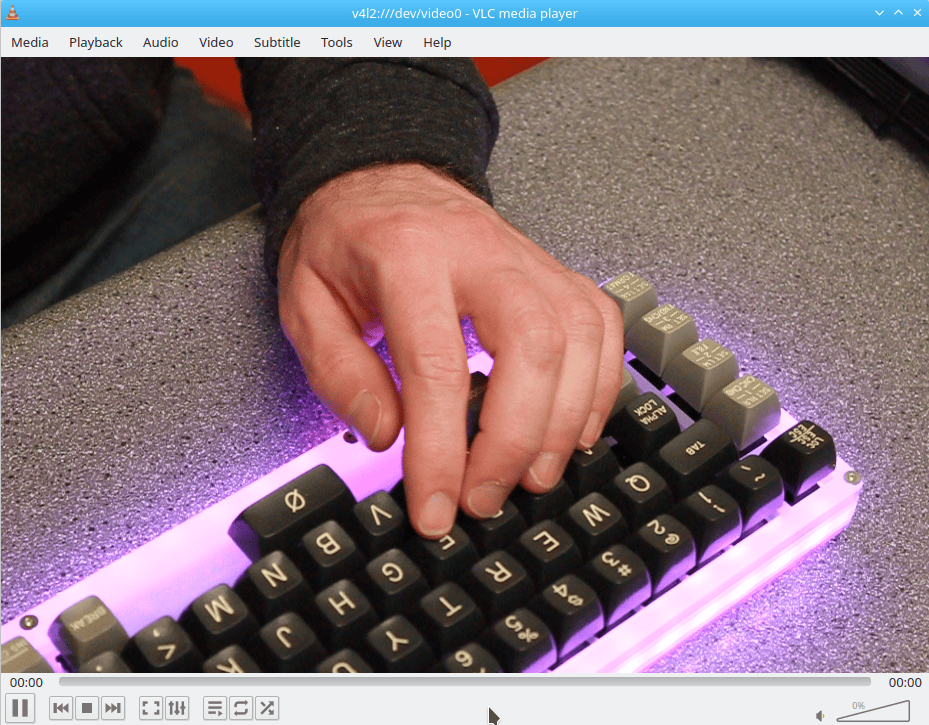
You should now see a live stream from your DSLR camera!
Video Conferencing with a DSLR Webcam
You now have all the components working together, allowing your DSLR to be used as a webcam in Linux. Ensure that you have the gphoto2 --stdout --capture-movie command running before starting your video conferencing application. Google Meet, Zoom, Microsoft Teams, WebEx, BlueJeans all work well with this setup.

Effectively using gPhoto
The capabilities of gPhoto are impressive — providing a unified interface to programmatically control hundreds of different physical cameras. With this broad capability comes some complexity — but once you understand the basics it’s not nearly as intimidating.
Three gPhoto Commands you need to know
gphoto2 --list-config--list-configwill produce a listing of all configuration entries specific to and available for your camera.
gphoto2 --get-config [config]--get-configwill list the type, the current value and the available options of a configuration value. As an example:
$ gphoto2 --get-config whitebalance
    Label: WhiteBalance
    Readonly: 0
    Type: RADIO
    Current: Auto
    Choice: 0 Auto
    Choice: 1 Daylight
    Choice: 2 Shadow
    Choice: 3 Cloudy
    Choice: 4 Tungsten
    Choice: 5 Fluorescent
    Choice: 6 Flash
    Choice: 7 Manual
gphoto2 --set-config-value [config]--set-config-valuewill set the specified configuration entry by specifying its new value. The output of--get-configwill provide the values which are possible to set. Another example:
gphoto2 --set-config-value whitebalance="Daylight"
You can also chain multiple --set-config-value commands, to get the exact setup you’re looking for:
gphoto2 --set-config-value whitebalance="Daylight" --set-config-value aperture="3.5"
gPhoto Shell
gPhoto also provides an interactive shell, which is very useful for testing out various configurations:
$ gphoto2 --shell
gphoto2: {/home/ben} /> get-config whitebalance
Label: WhiteBalance
Readonly: 0
Type: RADIO
Current: Auto
Choice: 0 Auto
Choice: 1 Daylight
Choice: 2 Shadow
Choice: 3 Cloudy
Choice: 4 Tungsten
Choice: 5 Fluorescent
Choice: 6 Flash
Choice: 7 Manual
END
gphoto2: {/home/ben} /> set-config whitebalance=4