Configuring Ultimaker Cura to Support the Flashforge Finder 3D Printer
The Flashforge Finder 3D printer is a good off-the-shelf printer for someone new to 3D printing, and the included Flashprint software is a decent slicer for getting you started with the Flashforge Finder. There are many alternate slicers available on the market all of which provide advanced features and functionality, and generally allow for the advanced configuration and tweaking needed to produce more complex 3D prints. Unfortunately most do not support the Flashforge Finder natively, but require manual configuration to be useful.
Through much Googling, trial and error I now have Ultimaker Cura successfully configured for use with a version 1 Flashforge Finder, here’s the guide for how it’s done.
- Download , install and launch Ultimaker Cura
- Within the Cura application, select the Preferences Menu ➔ Configure Cura
- Within the Printers Section
- Click the + Add Button
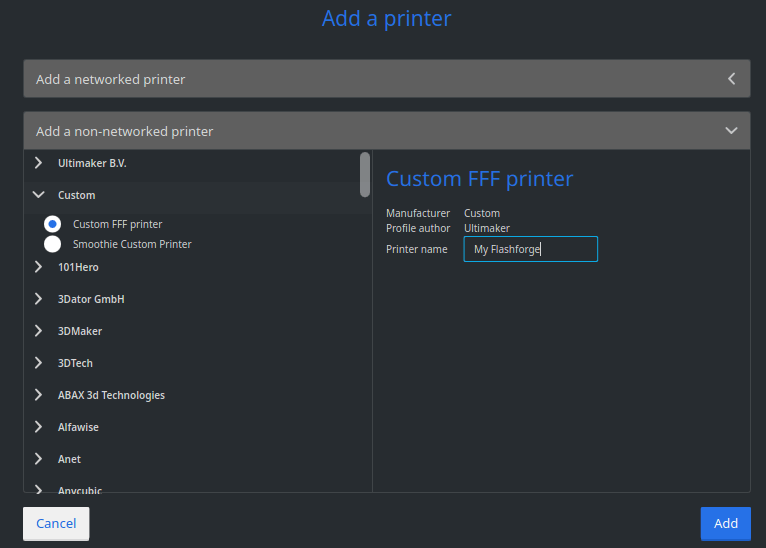
- Expand the Add a non non-networked printer section
- Expand the Custom section
- Select Custom FFF printer
- Click the Add button
- Enter the following settings within the Printer tab of the Machine Settings page:
- X(Width): 160
- Y(Depth): 160
- Z(Height): 140
- Build Plate Shape: Rectangular
- Origin at center: ✓ (Selected)
- Enter the following Printhead Settings:
- X min: -20
- Y min: -10
- X max: 37
- Y max: 55
- Gantry Height: 28
- Number of Extruders: 1
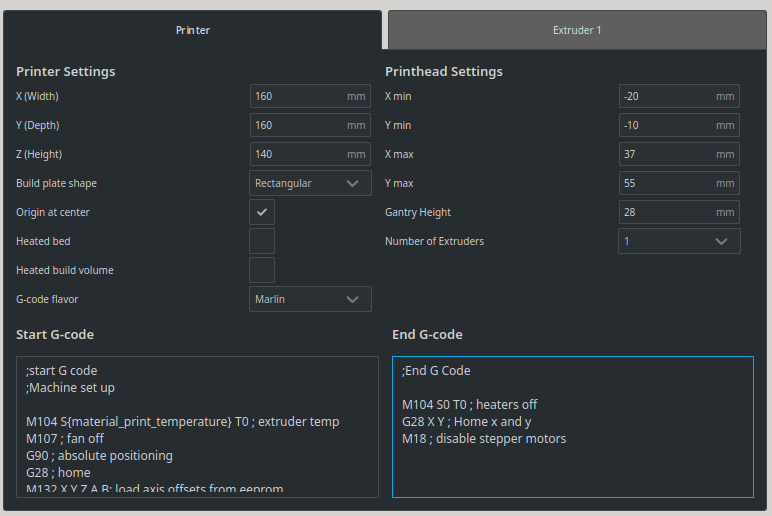
- Enter the following Start G-code:
;start G code
;Machine set up

M104 S{material_print_temperature} T0 ; extruder temp
M107 ; fan off
G90 ; absolute positioning
G28 ; home
M132 X Y Z A B; load axis offsets from eeprom
G1 Z50.00 F400 ; Lower bed
G161 X Y F3300 ; home x and y to min
M6 T0 ; select tool 0
M907 X100 Y100 Z40 A80 B20 ; Set motor voltages
M108 T0 ; Tool 0
- Enter the following End G-code:
;End G Code

M104 S0 T0 ; heaters off
G28 X Y ; Home x and y
M18 ; disable stepper motors
- Leave all other options at their default settings
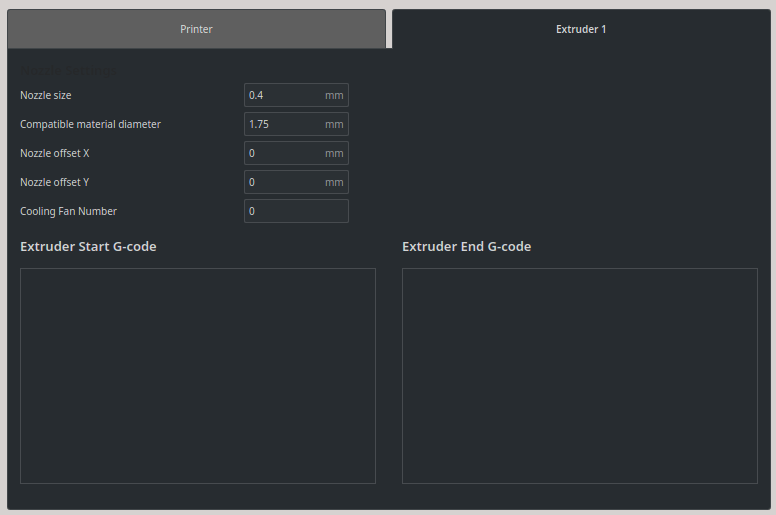
Click on the Extruder 1 tab of the Machine Settings page:
- Nozzle Size: 0.4
- Compatible Material Diameter: 1.75
- Leave all other options at their default settings
Press the Next button and that’s it; you’re finished with the Cura configuration for Flashforge Finder 3D printers!
You can now load, manipulate and slice your STL files in Cura, and send directly to your Flashforge Finder 3D printer through networked printing, sneaker-net via a USB stick or through the excellent OctoPrint software.